
Showing posts with label anti-grav. Show all posts
Showing posts with label anti-grav. Show all posts
Friday, 4 November 2011
Watcher bots...
Been working on these floating robots recently and got some cast up in resin. I wanted to make them kind of sinister with lots of "eyes" around the body something like a robot Beholder from D&D. Could use them as security bots or even something along the lines of a force like the Daleks. Hoping to get these painted up sometime over the weekend to see how the look with a lick of paint.

Friday, 14 October 2011
Anti-grav flit WIP
My girlfriend went shopping the other day and came back with a this for me!

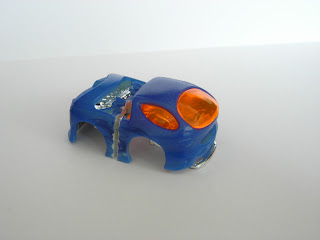
She said she saw it and thought it was "spacy" looking. It called DEORA 11 from hotwheels and definately has some 15mm sci-fi potential. First thoughs were to to remove wheels and fill in the gaps for a nice anti-grav truck. Then I spotted the surf boards on the back so began thinking about ways to remove or hide them. It occured that it may look cooler with the whole of the mid section removed making a small 2-seater flit.
It only had one rivet on the bottom and it's plastic so it was a matter of seconds to scalpel it off and get to the parts.

Once it was apart I could dremel the mid section away resulting in this.

I think I'll fill the gap between the back of the cab and the arch over the engine so that the engine will only be seen from the rear. Will end up being something like this.

The bottom of the windscreen over hangs the body so this will have to be sorted either sanding the windscreen back and then buffing it smooth or building the front of the body out a bit. Just need to work out a way to join the two halves so the interior bits will still fit in.

She said she saw it and thought it was "spacy" looking. It called DEORA 11 from hotwheels and definately has some 15mm sci-fi potential. First thoughs were to to remove wheels and fill in the gaps for a nice anti-grav truck. Then I spotted the surf boards on the back so began thinking about ways to remove or hide them. It occured that it may look cooler with the whole of the mid section removed making a small 2-seater flit.
It only had one rivet on the bottom and it's plastic so it was a matter of seconds to scalpel it off and get to the parts.

Once it was apart I could dremel the mid section away resulting in this.


I think I'll fill the gap between the back of the cab and the arch over the engine so that the engine will only be seen from the rear. Will end up being something like this.

The bottom of the windscreen over hangs the body so this will have to be sorted either sanding the windscreen back and then buffing it smooth or building the front of the body out a bit. Just need to work out a way to join the two halves so the interior bits will still fit in.
Saturday, 13 August 2011
Hotwheels h2go landspeeder

A few years back I picked up this hotwheels model. Even though it's a speedboat with a massive petrol engine I always thought it'd make a cool sci-fi landspeeder. Considering it's a toy that cost just over a pound there are some nice details on the model.

In order to paint some of the parts it's worth breaking the model apart by drilling out the two rivet heads on the underside of the model. I find it best to do this by hand with a 15/20mm drill bit.

Once the rivet caps are off the model can be broken apart. Took the wheels off and put them in the bits box.

At this stage I went over the two body halves with a fine wet and dry paper to give the primer something to key too. Then all the bits were cleaned and primed grey.
Going for a two tone paint job I settled on a Turquiose and off-white for the body and interior, with the seats and steering wheel a leather brown. Engine would be drybrushed metallic silver. Here's a pic with some of the base colour applied. Looked a bit clean at this stage...

Once all the basic painting was done it was dirtied up by smearing some washes of black and leather brown to some areas of the model, particularly the underside and the rear near the engines, then some areas were scraped away to show some of the original red paint.

The model re-assembled prior to varnishing. Once it's all varnished and glued I'll probably use 3 bits of brass rod under the body to raise it off the ground slightly for an anti-grav effect. I'm pretty pleased with how the scrapes look where the original red colour is showing through.

Subscribe to:
Posts (Atom)